How to Use the Partition Wizard Boot Disk to Create Partitions Ahead of an Existing Install So It Will be First on the Hard Disk Drive
There comes a time when all good things cease to be as useful as they once were and a Windows Operating Systems (OS) is no exception to that rule; this tutorial will show how to use the free Partition Wizard bootable CD (PWBD) to create one (or more) partitions in front of an existing Windows installation so a newer version can be installed to that space, so that at a later time, if the need arises it will be much easier to remove an older / existing OS with little or no actual interruptions to one's routine; it will also make it easier to move data from the older OS to the new one.
There comes a time when all good things cease to be as useful as they once were and a Windows Operating Systems (OS) is no exception to that rule; this tutorial will show how to use the free Partition Wizard bootable CD (PWBD) to create one (or more) partitions in front of an existing Windows installation so a newer version can be installed to that space, so that at a later time, if the need arises it will be much easier to remove an older / existing OS with little or no actual interruptions to one's routine; it will also make it easier to move data from the older OS to the new one.
Information
Partition Wizard is a very reliable tool for your tool kit and it is a free download for home / personal use, it can be found at the link below, download the ISO file to your desktop then burn the image file to a CD, Windows 7 now has native support for ISO files.
As it was designed for use from a CD it will be best to burn it to a CD and not a DVD.Partition Wizard Bootable CD allows user to boot computer directly to manage partition.
Warning
As with anything that makes changes to the Windows structure there is always the chance for an error to occur, it would be advisable to make reliable backups to the media of your choice of any important data, i.e. pictures, music or documents, that you would not want to lose before you make any changes to your system, it is always better to be safe than sorry.
Let's get started!
In the BIOS set the boot order to boot first from the Optical Disk Drive (ODD), insert the Partition Wizard Bootable Disk (PWBD) and re-start the PC. It'll take a minute or two for it to setup with no input from the user needed.
Once the program has started you can remove the disk from the ODD.
Step One
Shrink the OS Partition
Warning
Do not attempt to shrink an existing Windows OS partition to a size smaller than the space it currently, actually takes up on the Hard Disk Drive (HDD), doing so may result in the complete loss of Windows and all of its contents. The actual current size can viewed by clicking the "Computer" button in the Windows start menu before you start this process.
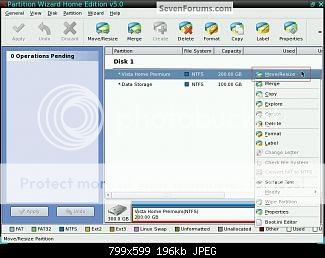
1) Right click the OS partition you want to shrink and click "Move/Resize".
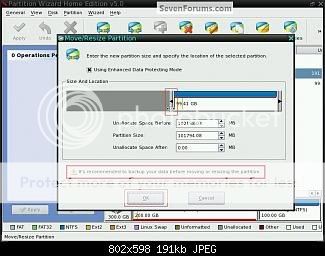
2) In the dialog box that opens click and hold to drag the left slider to the size you want to shrink the OS partition and click ok.
If you are not satisfied with the size you set and want to re-do it or want to cancel the operation all-together, you can click the "Undo" button to remove the current setting before you click the "Apply, Yes" buttons but not after, once the operation has started it is too late go back.
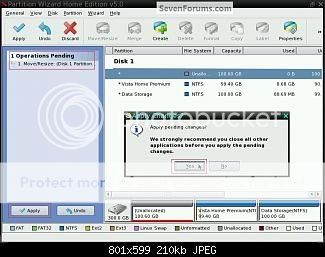
3) In the left pane "Operations Pending" column click Apply then Yes to the 'apply changes' conformation dialog box.
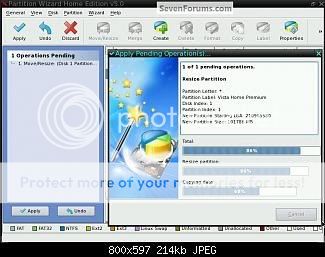
4) You will get a progress graph, when it finishes click ok to the successful box.
This could take quite a bit of time depending how big the Operating System and the amount of personal data including the installed programs/apps there are, just be patient and let it complete.
5) It is absolutely necessary to boot back into Windows after this step has completed so that Windows can absorb these changes to the system volume.
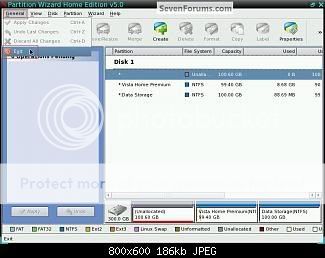
Remove the PWBD from the ODD and at the upper left corner at "General" click "Exit" to end the Partition Wizard program and restart Windows.
Note to XP users: Windows XP will "Discover new Devices" as soon as it starts up and will demand a restart to complete the process, it would be wise to oblige it!
It would be a good idea to do several restarts and use the PC a little to make sure everything is ok before you continue on to the next step.
Step Two
--------------------------------------------------------------------------------
Create the New Partition
Now that you have restarted the PC several times and you are sure everything is ok and you have made backups of anything important; put the PWBD back into the ODD and restart the PC.
There are 2 quick, small steps to do here and they can be done at the same time so read through this section first to get an idea of how to go about it before you start; remember you can always click the "Undo" button to start over before you click the final "Apply, Yes" to create the partition.
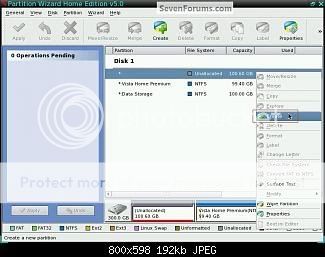
1) Right click the new space created in the previous Step One and click "Create".
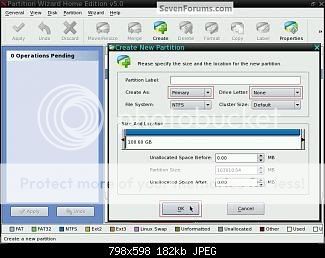
2) There's no need to add a "Label" to it yet since that has to be done again in the next step, make sure it's a "Primary" and that "None" is selected for "Drive Letter" and click ok.
3) Now right click the new partition and click "Format".
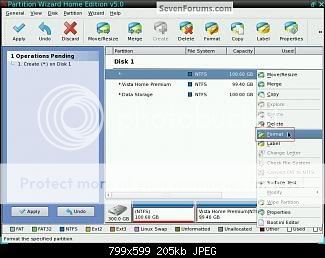
4) In the dialog box that opens give the new partition a name at "Partition Label" so it is easily identifiable during the Windows 7 installation (it can be anything you like) make sure the "File System" is still "NTFS" and click ok.
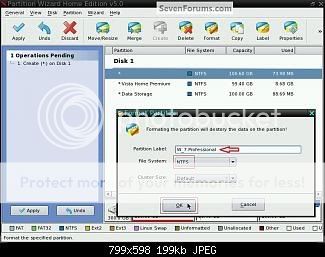
5) When it is as you like, in the left pane "Operations Pending" column click Apply then Yes to the 'apply changes' conformation dialog box then OK for the final 'successful' box.
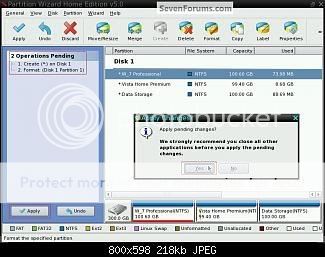
) It is just as necessary to restart Windows after these steps as it previously was, to let the OS accept these changes to the system volume.
Remove the PWBD from the ODD and at "General" click "Exit" to close the PW program and restart Windows.
Note to Vista users: This is where Vista "Detects" the new partition but does not really demand a restart as XP does, though it would be a good idea to do several restarts and use the PC a little before you install Windows 7 to make sure everything is ok.
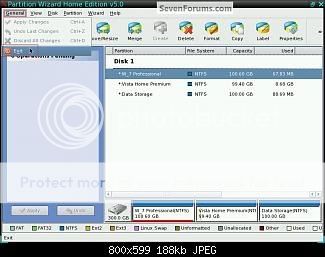
That's it, you are finished with the Partition Wizard program and you can now install Windows 7 to the new partition you just created; you can view this
How to Run a Startup Repair in Windows 7
Final Step
--------------------------------------------------------------------------------
Removing Vista / XP
Once you have made backups and moved all the important data you need to save from the old Windows and you want to remove the older OS completely, it's not all that complicated a process.
You will need to mark the new Windows 7 partition as "Active" so that the repair procedure will know where you want the new system volume, (the partition the boot files that are needed to start Windows are stored on), then you will need to run 3 separate startup repairs with a system restart between each repair so that Windows will create the new boot files to the new "Active" location.
It would be best to do a partition specific wipe to the old Windows partition before that space is recovered into the new Windows installation, Option Three here, so all the old Windows code is over-written / removed first.
View these tutorials below that explain the process in greater detail and if assistance is needed post a question in this same tutorial and we will assist you.
How to Run a Startup Repair in Windows 7
Startup Repair - Run 3 Separate Times to Repair Boot Issues
Delete and Extend a Partition with Disk Management
Information
For those that have the space to create it and are interested, it is a very easy process to create the new "System Reserved" partition that is created by default when Windows 7 is installed to a new "unallocated" Hard Disk Drive (HDD) and make that the "System, Active" partition during the installation process, it was my intention to include those steps in this tutorial but as it requires different installation instructions for Vista than it does for XP it is too involved a process for the scope of this article.
If anyone cares to start a discussion on that aspect of this topic, feel free to post a question in this tutorial and we'll take it up from there.
Last edited:
