How To Unlock Any Jailbroken iPhone On Any Baseband And Firmware
It seems that jailbreakers and potential unlockers are having to wait longer and longer for news to cheer about as the cat and mouse game with Apple and the networks becomes more and more difficult for those involved in producing jailbreaks and iPhone unlocks. Once upon a time, when a new firmware was released, it didn’t seem to take that long for the development teams to pull something together to release to the public, but as time progresses it also seems that the difficulty levels involved in this kind of work is increasing dramatically.
With that in mind, the news this morning, brought to the attention of the masses by iPhone Dev-Team leader MuscleNerd, should certainly raise a smile on the faces of those who require a network unlock on their jailbroken iPhone. MuscleNerd has confirmed that a Chinese researcher by the name of Loktar_Sun has discovered a method for unlocking jailbroken iPhones with the help of the Subscriber Artificial Module (SAM) by Sam Bingner.

The release of the method comes after the researchers and developers involved delved deeper into the possibilities that the SAM package provided, something that MuscleNerd himself concedes he and his team didn’t do effectively. To proceed with the unlock, users will need a few things which are detailed below. It is also worth noting that this unlock method produces a ticket that is valid only for the SIM card that is used during the procedure, meaning that if you have additional SIM cards that you wish to use in the unlocked iPhone, you will need to repeat the process with each SIM.
Requirements: Before following this procedure, users will need to have a jailbroken iPhone that is not listed on any IMEI blacklists. A computer with a fully working internet connection and the latest version of iTunes installed is also required, as is the original carrier information of the locked device in question.
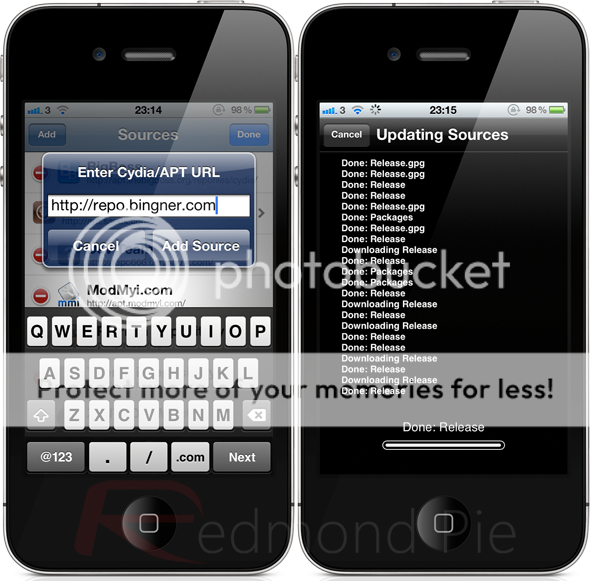
Step 1: Open up Cydia on the jailbroken iPhone and add the official repository for the SAM package. The repo URL is http://repo.bingner.com and contains the official up to date SAM package and the required dependencies.

Step 2: Launch the SAM interface. This can be achieved by tapping the SAMPrefs icon that can be found on your Springboard, or by finding the SAM preferences bundle through the Settings.app. Make sure that the SIM card that you intend to use is present in the iPhone.
Step 3: After SAM has been launched, select the ‘Utilities‘ option before selecting ‘De-Activate iPhone‘. If this has been done correctly, the device ActivationState should now read as ‘Unactivated‘.
Step 4: Keep SAM enabled and choose ‘By Country and Carrier‘ in the Method options. The next step is to find your carrier in this list. Be aware that some networks work with more than network ID, therefore meaning users may need to select the ‘SIM ID‘ option.
Step 5: Head on over to ‘More Information‘ and make a note of the IMSI that is present in the ‘SAM Details‘ section before tapping ‘Spoof Real SIM to SAM‘. Head back to the main SAM screen and change ‘Method‘ to manual and paste or enter the IMSI string that you should have made a copy of.
Step 6: The next step is to connect the iPhone to the computer using the supplied USB cable and allow iTunes to re-activate the phone. When done, double click the Phone Number section of the device details and make sure that the displayed ICCID matches that found on the SIM card. If the strings do not match, the process will need to be repeated from the beginning.

Step 7: If the strings match then unplug the device and disable the SAM package. Re-connect the device to iTunes and do not be alarmed by any error messages that may pop-up saying that the device cannot be activated. This error is normal and requires iTunes to be shut down and then re-opened.
Step 8: After a short period of time, the iPhone should display those beautiful signal bars meaning that the process has been successful. If you find that push notifications have ceased working, this can be resolved by selecting the ‘Clear Push‘ option in SAM and then connecting the device to iTunes.
As mentioned earlier on, following this procedure means that the iPhone will only work with the SIM that was used during the unlock process. If you intend on using multiple SIM cards with the unlocked iPhone then the process will need to be repeated with each SIM on an individual basis. The team involved in producing this unlock have also recommended it as good practice to make a manual save of each ticket that is generated due to the fact that it could prove crucial going forward.
Manually saving each valid unlock ticket
Step 1: Run through Steps 1-8 above for each required SIM card, making sure that the method is successful each time.
Step 2: SSH into the jailbroken device using something like iFile or a desktop client.
Step 3: Navigate to /var/Root/ibrary/Lockdown and make a local copy of everything that is found in that directory for each SIM card.
There you have it, a somewhat lengthy but extremely worthwhile method to unlocked a jailbroken iPhone using the SAM package. Enjoy the freedom.
Also will explain after on how to Regarding sim cards
INFORMATION GIVEN FOR EDUCATIONAL PURPOSES ONLY
It seems that jailbreakers and potential unlockers are having to wait longer and longer for news to cheer about as the cat and mouse game with Apple and the networks becomes more and more difficult for those involved in producing jailbreaks and iPhone unlocks. Once upon a time, when a new firmware was released, it didn’t seem to take that long for the development teams to pull something together to release to the public, but as time progresses it also seems that the difficulty levels involved in this kind of work is increasing dramatically.
With that in mind, the news this morning, brought to the attention of the masses by iPhone Dev-Team leader MuscleNerd, should certainly raise a smile on the faces of those who require a network unlock on their jailbroken iPhone. MuscleNerd has confirmed that a Chinese researcher by the name of Loktar_Sun has discovered a method for unlocking jailbroken iPhones with the help of the Subscriber Artificial Module (SAM) by Sam Bingner.

The release of the method comes after the researchers and developers involved delved deeper into the possibilities that the SAM package provided, something that MuscleNerd himself concedes he and his team didn’t do effectively. To proceed with the unlock, users will need a few things which are detailed below. It is also worth noting that this unlock method produces a ticket that is valid only for the SIM card that is used during the procedure, meaning that if you have additional SIM cards that you wish to use in the unlocked iPhone, you will need to repeat the process with each SIM.
Requirements: Before following this procedure, users will need to have a jailbroken iPhone that is not listed on any IMEI blacklists. A computer with a fully working internet connection and the latest version of iTunes installed is also required, as is the original carrier information of the locked device in question.
Step 1: Open up Cydia on the jailbroken iPhone and add the official repository for the SAM package. The repo URL is http://repo.bingner.com and contains the official up to date SAM package and the required dependencies.

Step 2: Launch the SAM interface. This can be achieved by tapping the SAMPrefs icon that can be found on your Springboard, or by finding the SAM preferences bundle through the Settings.app. Make sure that the SIM card that you intend to use is present in the iPhone.
Step 3: After SAM has been launched, select the ‘Utilities‘ option before selecting ‘De-Activate iPhone‘. If this has been done correctly, the device ActivationState should now read as ‘Unactivated‘.
Step 4: Keep SAM enabled and choose ‘By Country and Carrier‘ in the Method options. The next step is to find your carrier in this list. Be aware that some networks work with more than network ID, therefore meaning users may need to select the ‘SIM ID‘ option.
Step 5: Head on over to ‘More Information‘ and make a note of the IMSI that is present in the ‘SAM Details‘ section before tapping ‘Spoof Real SIM to SAM‘. Head back to the main SAM screen and change ‘Method‘ to manual and paste or enter the IMSI string that you should have made a copy of.
Step 6: The next step is to connect the iPhone to the computer using the supplied USB cable and allow iTunes to re-activate the phone. When done, double click the Phone Number section of the device details and make sure that the displayed ICCID matches that found on the SIM card. If the strings do not match, the process will need to be repeated from the beginning.

Step 7: If the strings match then unplug the device and disable the SAM package. Re-connect the device to iTunes and do not be alarmed by any error messages that may pop-up saying that the device cannot be activated. This error is normal and requires iTunes to be shut down and then re-opened.
Step 8: After a short period of time, the iPhone should display those beautiful signal bars meaning that the process has been successful. If you find that push notifications have ceased working, this can be resolved by selecting the ‘Clear Push‘ option in SAM and then connecting the device to iTunes.
As mentioned earlier on, following this procedure means that the iPhone will only work with the SIM that was used during the unlock process. If you intend on using multiple SIM cards with the unlocked iPhone then the process will need to be repeated with each SIM on an individual basis. The team involved in producing this unlock have also recommended it as good practice to make a manual save of each ticket that is generated due to the fact that it could prove crucial going forward.
Manually saving each valid unlock ticket
Step 1: Run through Steps 1-8 above for each required SIM card, making sure that the method is successful each time.
Step 2: SSH into the jailbroken device using something like iFile or a desktop client.
Step 3: Navigate to /var/Root/ibrary/Lockdown and make a local copy of everything that is found in that directory for each SIM card.
There you have it, a somewhat lengthy but extremely worthwhile method to unlocked a jailbroken iPhone using the SAM package. Enjoy the freedom.
Also will explain after on how to Regarding sim cards
INFORMATION GIVEN FOR EDUCATIONAL PURPOSES ONLY
Last edited by a moderator:
