- Joined
- Dec 27, 2005
- Messages
- 8,538
- Reaction score
- 741
How to Softmod Your Xbox Using XboxHDM (Ndure)
This tutorial was written by Textbook and uses tools that Textbook did not make. He takes no credit for any of these, and gives full credit to the authors. All Textbook did was re-write the method involved in softmodding the Xbox using certain tools. This method would not be possible if we didn’t have many dedicated people in the Xbox-Scene. Although there are many people who helped this method become possible, the big names stand out and I feel they need to be credited. A huge thanks is given to ldots, kingroach, DaddyJ, eh/ndure protagonist, Cio, Krayzie, angerwound, pedros pad, devz3ro, and any other softmod people I missed. Without them, this would not be possible.
First of all, it is HIGHLY recommended that you read the following threads:
The Art of Hotswapping (DaddyJ)
XboxHDM For Dummies (Kingroach)
**NOTE – The creator of this tutorial, Textbook, nor www.xbox-scene.com or any of its members are responsible for any damage that may be caused while attempting anything in this tutorial. If you attempt in doing this, you do so at your own risk. If something gets broken, it’s only your own fault and you should not blame anybody. Please notice that according to ANSI standards, hotswapping is not considered safe and is therefore only recommended if you can’t find another way to modify your Xbox. For more information on the technical details and safety of hotswapping, please DaddyJ's FAQ titled "The Art of Hotswapping" **
Alright, let's get started...
Note: It is recommended to update your dashboard to MS Dash version 5960. While this may not be necessary for everybody, this tutorial will not work for people who have the 4034 dash. To avoid any and all problems, upgrading the dash to 5960 is highly recommended because nobody should have problems if they are running that dashboard. This softmod works perfectly with the 5960 dashboard version.
To update your dashboard, you can use any newer (post-Halo 2) retail Xbox LIVE game. You don't have to have Xbox LIVE, you don't have to have an internet connection, and you don't even have to have a network cable plugged into the Xbox. Just load up Halo 2 or any game made after that, select Xbox LIVE, and it will proceed to upgrade your Xbox dashboard.
Kernel/Dashboard Version
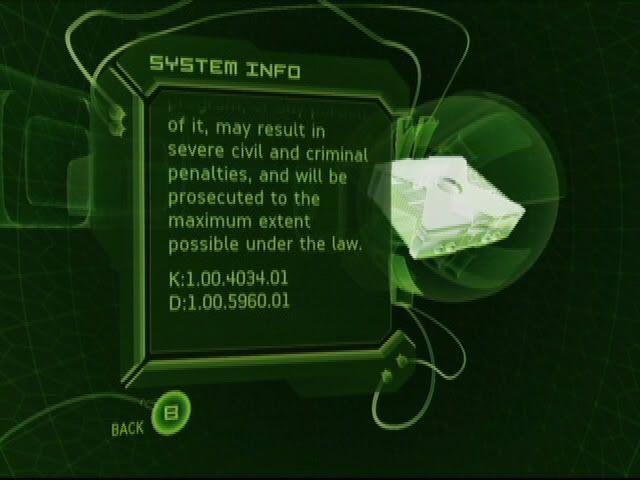
The first thing you need to do is find your current retail Xbox's Kernel and Dashboard version. To do this, boot up to the MS Dashboard, go to Settings, and the System Info. After the scrolling text, you should see this at the bottom.
K:1.00.XXXX.01
D:1.00.YYYY.01
XXXX is the Xbox kernel version and YYYY is the Xbox dashboard version.
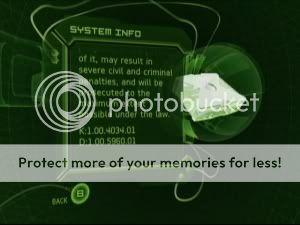
In this example, my kernel is 4034 and my dashboard is 5960
Write your numbers down and remember these two numbers, you will need them later.
Materials
Desktop PC
Xbox
CD Recorder in your PC
Blank CD-R
ISO Recorder v2 (Right click, save target as/save link as)
WinRAR
XboxHDM v1.9 (Right click, save target as/save link as)
Kingroach's NDURE 3.0 (Right click, save target as/save link as)
Torx 20 Screwdriver for opening the xbox
Whatever is needed to open up your computer case
Some intelligence and patience
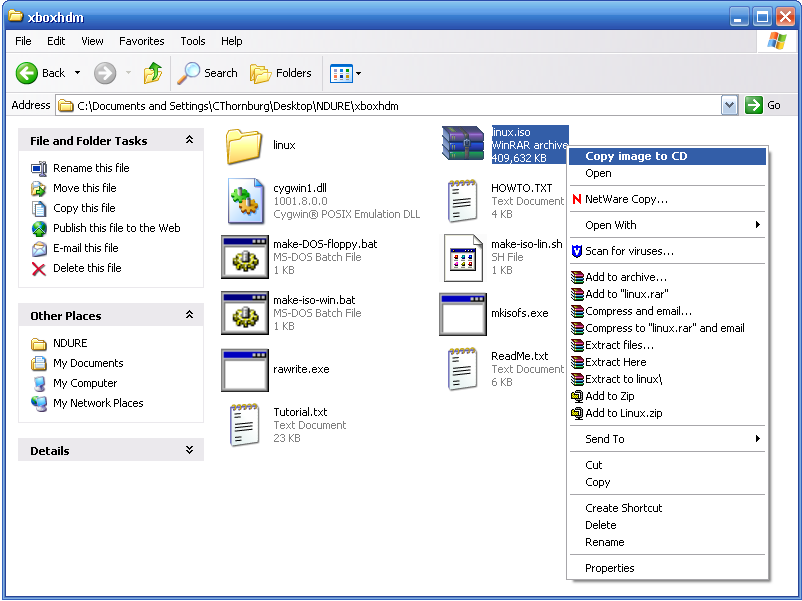
Download the necessary files from above. Install ISO Recorder and WinRAR. After WinRAR is installed, use it to extract xboxhdm.
Edit Timeout Value To 10 Minutes (This step is completely optional, it changes your hotswap "window" from 5 minutes to 10 minutes)
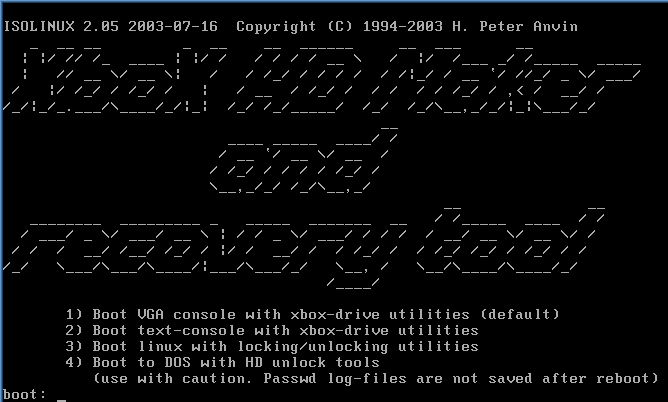
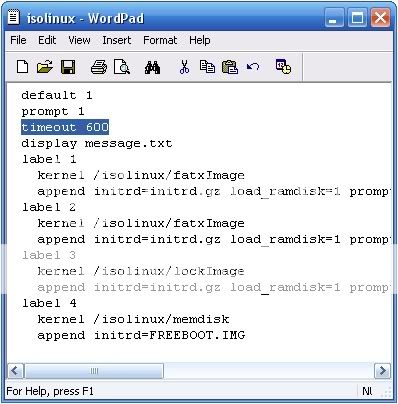
Next, we will increase the amount of time that XboxHDM will stay at its menu. By default, it is only set to stay at the menu for 5 minutes before defaultly entering into VGA Mode. We will increase this time to 10 minutes. To do this, locate the following file:
- xboxhdm/linux/isolinux/isolinux.cfg
Right-click on this and choose to Open with... and choose wordpad. Change the timeout value from 300 to 600 like the picture below.
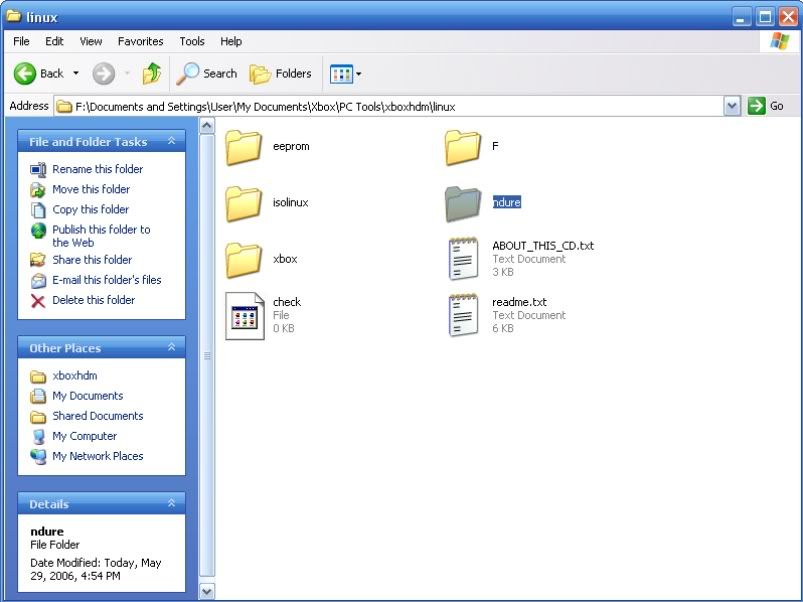
Now it is time to set up NDURE. When you downloaded NDURE from Xbins, it should have been a RAR archive titled “NDURE-3.0”. Use WinRAR to extract this archive. When extracted, there should be 4 files ( Ndure 3.0.exe , Ndure Installer 3.nfo, Ndure Installer 3.txt, and a Readme.pdf ). I highly suggest reading the Readme, as most of this tutorial is based off of Kingroach’s provided information in that Readme.
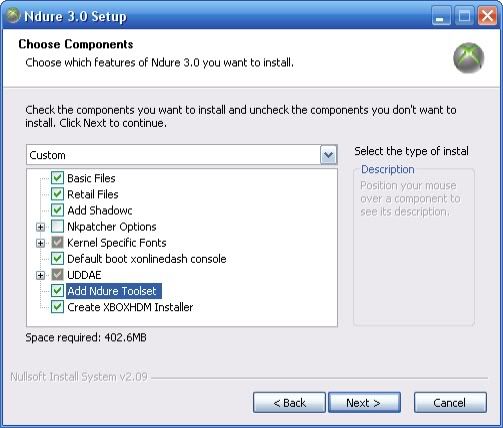
Double-click on the Ndure 3.0 with the Xbox 360 logo to run the program, and hit Next. You should see this screen.
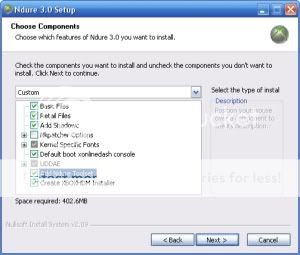
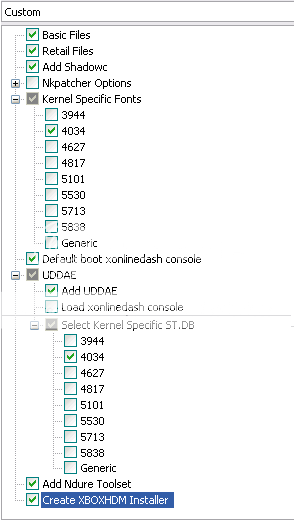
Now, here is where you can customize your install and choose the installation that is right for you. There are different features that can be enabled/disabled, but I’ll run you through the install I performed, which should work out good for most people. Again, this is my personal preference, so you can change some stuff around if you know what you’re doing. If you have no idea what each thing does, just do it my way.
Ndure Options
First, I will briefly explain what each option does.
Basic Files - These are the basic files and are required for the softmod to function.
Retail Files - These are the files necessary so that you can have MS Dash access. Most people should leave this checkmarked, the only people who would not need this are people who do not have Xbox LIVE and have no need for the memory and music functions of the MS Dash. You don’t gain anything by leaving this box unmarked, so you might as well include it.
Shadow C - Recommended for all users, because it prevents your Xbox from dash updates overwriting the softmod.
NKPatcher Options
NKP .67 - Use this if you have a hard drive over 200 gb, this will create a G partition.
NKP RGB - Use this if you are going to use the Xbox primarily with VGA output on a computer monitor (Only works with Focus video encoders)
NKP Progressive - This forces 480p for anything that attempts to run in 480i.
Kernel Specific Fonts - These fonts are designed to work exclusively with a certain kernel version. It is recommended to use a kernel specific font, as it should prevent any problems and provide an incredible level of stability.
Default boot xonlinedashconsole - Enabling this option will set up the dualboot feature. When the Xbox is powered on by using the eject button, and the softmod detects an open disc tray, it will boot to the Xbox LIVE Online Dash. In this screen, you can manage all of your network settings, as well as manage Xbox LIVE accounts.
UDDAE - This is a “backdoor” rescue dash that is based off of the Easter Egg Exploit, the uberdash, and an audio exploit. The thing about UDDAE is it allows you to completely turn off your softmod, going to a retail, unmodded state. Now, once your softmod is deactivated, how are you going to activate it? In order to switch it back on, we need to change some files around on the Xbox, and we can't mess with the files in an unmodded state. Basically, the problem lies in we need to have it modded in order to 'turn on' the mod. Which really makes no sense. This is where UDDAE comes to the rescue. Even with the softmod deactivated, we have a way to run homebrew code through a set of actions in the MS Dashboard. While this is a great feature for advanced users, it will not be used by the average user, but it doesn’t hurt anybody by installing it. If you are interested in this, you can read up on SCEEE HERE and UDDAE HERE.
Ndure Toolset - This is a set of tools designed by kingroach to help with your EEPROM backups and other maintenance. It is basically a simple menu that helps you to protect your softmod and keep it running smooth and provides you with the information needed to save your Xbox if anything goes wrong. Just another way kingroach looks out for his users and wants to make them feel safe. While I have never personally used this, I would recommend installing this.
This tutorial was written by Textbook and uses tools that Textbook did not make. He takes no credit for any of these, and gives full credit to the authors. All Textbook did was re-write the method involved in softmodding the Xbox using certain tools. This method would not be possible if we didn’t have many dedicated people in the Xbox-Scene. Although there are many people who helped this method become possible, the big names stand out and I feel they need to be credited. A huge thanks is given to ldots, kingroach, DaddyJ, eh/ndure protagonist, Cio, Krayzie, angerwound, pedros pad, devz3ro, and any other softmod people I missed. Without them, this would not be possible.
First of all, it is HIGHLY recommended that you read the following threads:
The Art of Hotswapping (DaddyJ)
XboxHDM For Dummies (Kingroach)
**NOTE – The creator of this tutorial, Textbook, nor www.xbox-scene.com or any of its members are responsible for any damage that may be caused while attempting anything in this tutorial. If you attempt in doing this, you do so at your own risk. If something gets broken, it’s only your own fault and you should not blame anybody. Please notice that according to ANSI standards, hotswapping is not considered safe and is therefore only recommended if you can’t find another way to modify your Xbox. For more information on the technical details and safety of hotswapping, please DaddyJ's FAQ titled "The Art of Hotswapping" **
Alright, let's get started...
Note: It is recommended to update your dashboard to MS Dash version 5960. While this may not be necessary for everybody, this tutorial will not work for people who have the 4034 dash. To avoid any and all problems, upgrading the dash to 5960 is highly recommended because nobody should have problems if they are running that dashboard. This softmod works perfectly with the 5960 dashboard version.
To update your dashboard, you can use any newer (post-Halo 2) retail Xbox LIVE game. You don't have to have Xbox LIVE, you don't have to have an internet connection, and you don't even have to have a network cable plugged into the Xbox. Just load up Halo 2 or any game made after that, select Xbox LIVE, and it will proceed to upgrade your Xbox dashboard.
Kernel/Dashboard Version
The first thing you need to do is find your current retail Xbox's Kernel and Dashboard version. To do this, boot up to the MS Dashboard, go to Settings, and the System Info. After the scrolling text, you should see this at the bottom.
K:1.00.XXXX.01
D:1.00.YYYY.01
XXXX is the Xbox kernel version and YYYY is the Xbox dashboard version.
In this example, my kernel is 4034 and my dashboard is 5960
Write your numbers down and remember these two numbers, you will need them later.
Materials
Desktop PC
Xbox
CD Recorder in your PC
Blank CD-R
ISO Recorder v2 (Right click, save target as/save link as)
WinRAR
XboxHDM v1.9 (Right click, save target as/save link as)
Kingroach's NDURE 3.0 (Right click, save target as/save link as)
Torx 20 Screwdriver for opening the xbox
Whatever is needed to open up your computer case
Some intelligence and patience
Download the necessary files from above. Install ISO Recorder and WinRAR. After WinRAR is installed, use it to extract xboxhdm.
Edit Timeout Value To 10 Minutes (This step is completely optional, it changes your hotswap "window" from 5 minutes to 10 minutes)
Next, we will increase the amount of time that XboxHDM will stay at its menu. By default, it is only set to stay at the menu for 5 minutes before defaultly entering into VGA Mode. We will increase this time to 10 minutes. To do this, locate the following file:
- xboxhdm/linux/isolinux/isolinux.cfg
Right-click on this and choose to Open with... and choose wordpad. Change the timeout value from 300 to 600 like the picture below.
Now it is time to set up NDURE. When you downloaded NDURE from Xbins, it should have been a RAR archive titled “NDURE-3.0”. Use WinRAR to extract this archive. When extracted, there should be 4 files ( Ndure 3.0.exe , Ndure Installer 3.nfo, Ndure Installer 3.txt, and a Readme.pdf ). I highly suggest reading the Readme, as most of this tutorial is based off of Kingroach’s provided information in that Readme.
Double-click on the Ndure 3.0 with the Xbox 360 logo to run the program, and hit Next. You should see this screen.
Now, here is where you can customize your install and choose the installation that is right for you. There are different features that can be enabled/disabled, but I’ll run you through the install I performed, which should work out good for most people. Again, this is my personal preference, so you can change some stuff around if you know what you’re doing. If you have no idea what each thing does, just do it my way.
Ndure Options
First, I will briefly explain what each option does.
Basic Files - These are the basic files and are required for the softmod to function.
Retail Files - These are the files necessary so that you can have MS Dash access. Most people should leave this checkmarked, the only people who would not need this are people who do not have Xbox LIVE and have no need for the memory and music functions of the MS Dash. You don’t gain anything by leaving this box unmarked, so you might as well include it.
Shadow C - Recommended for all users, because it prevents your Xbox from dash updates overwriting the softmod.
NKPatcher Options
NKP .67 - Use this if you have a hard drive over 200 gb, this will create a G partition.
NKP RGB - Use this if you are going to use the Xbox primarily with VGA output on a computer monitor (Only works with Focus video encoders)
NKP Progressive - This forces 480p for anything that attempts to run in 480i.
Kernel Specific Fonts - These fonts are designed to work exclusively with a certain kernel version. It is recommended to use a kernel specific font, as it should prevent any problems and provide an incredible level of stability.
Default boot xonlinedashconsole - Enabling this option will set up the dualboot feature. When the Xbox is powered on by using the eject button, and the softmod detects an open disc tray, it will boot to the Xbox LIVE Online Dash. In this screen, you can manage all of your network settings, as well as manage Xbox LIVE accounts.
UDDAE - This is a “backdoor” rescue dash that is based off of the Easter Egg Exploit, the uberdash, and an audio exploit. The thing about UDDAE is it allows you to completely turn off your softmod, going to a retail, unmodded state. Now, once your softmod is deactivated, how are you going to activate it? In order to switch it back on, we need to change some files around on the Xbox, and we can't mess with the files in an unmodded state. Basically, the problem lies in we need to have it modded in order to 'turn on' the mod. Which really makes no sense. This is where UDDAE comes to the rescue. Even with the softmod deactivated, we have a way to run homebrew code through a set of actions in the MS Dashboard. While this is a great feature for advanced users, it will not be used by the average user, but it doesn’t hurt anybody by installing it. If you are interested in this, you can read up on SCEEE HERE and UDDAE HERE.
Ndure Toolset - This is a set of tools designed by kingroach to help with your EEPROM backups and other maintenance. It is basically a simple menu that helps you to protect your softmod and keep it running smooth and provides you with the information needed to save your Xbox if anything goes wrong. Just another way kingroach looks out for his users and wants to make them feel safe. While I have never personally used this, I would recommend installing this.
Last edited by a moderator: