
- Joined
- Feb 21, 2013
- Messages
- 10,469
- Reaction score
- 13,894
This is the change-log of the update
2. It's a portable program, run the EXE, and its interface should pop-up.
3. Select the USB drive that you want to use. Pay attention to the Drive Letter, Volume Label if you have more than one storage device plugged into your computer, and choose the correct one.
4. The next step is to make the boot selection, choose the third option "Disk or ISO Image".
5. Click the Select button, and navigate to the location of the folder that contains the Windows 11 ISO.
Rufus can also be used to download the image directly using Fido, from the same developer. To use it, click the arrow icon next to the Select button, and hit the download option.
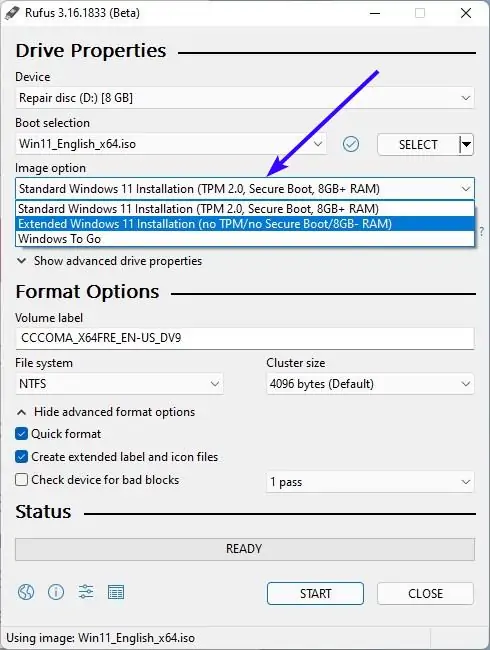
have done the above, some new menus will become available. The one we are interested in, is the Image Option menu. By default, it says Standard Windows 11 Installation. Click it and set the 2nd option, Extended Windows 11 Installation (no TPM, no Secure Boot, 8GB- RAM).
7. Leave all the other options at their default settings, i.e., the partition scheme, target system, Volume Label, File System and Cluster Size. Advanced users may customize the options as required.
Note: The quick format option is enabled by default, and will erase all data on your USB Drive.
8. You should see the "Ready" status at the bottom. Click the Start button to begin creating your bootable Windows 11 ISO without TPM, Secure Boot and RAM requirements.
Wait for Rufus to finish the task. Once it completes the job, you can use your bootable media to install or upgrade your operating system to Windows 11 on an unsupported computer.
Here's how to use the program. Before proceeding, make sure you have a USB flash drive that has a storage capacity of 8GB or more, for creating the bootable media. Please take a backup of any data, pictures or videos, that is on the flash drive before you go ahead, as formatting the thumb drive will erase all contents on it.
- Fix ISO mode support for Red Hat 8.2+ and derivatives
- Fix BIOS boot support for Arch derivatives
- Fix removal of some boot entries for Ubuntu derivatives
- Fix log not being saved on exit
- Add Windows 11 "Extended" installation support (Disables TPM/Secure Boot/RAM requirements)
- Add UEFI Shell ISO downloads (retroactively applied through FIDO)
- Add support for Intel NUC card readers
- Improve Windows 11 support
- Improve Windows version reporting
- Speed up clearing of MBR/GPT
How to disable TPM, Secure Boot and RAM requirements for Windows 11
1. Go to the official website and download the latest beta release. At the time of writing this article, the current build is Rufus Beta 2 (rufus-3.16_BETA2.exe)2. It's a portable program, run the EXE, and its interface should pop-up.
3. Select the USB drive that you want to use. Pay attention to the Drive Letter, Volume Label if you have more than one storage device plugged into your computer, and choose the correct one.
4. The next step is to make the boot selection, choose the third option "Disk or ISO Image".
5. Click the Select button, and navigate to the location of the folder that contains the Windows 11 ISO.
Rufus can also be used to download the image directly using Fido, from the same developer. To use it, click the arrow icon next to the Select button, and hit the download option.
have done the above, some new menus will become available. The one we are interested in, is the Image Option menu. By default, it says Standard Windows 11 Installation. Click it and set the 2nd option, Extended Windows 11 Installation (no TPM, no Secure Boot, 8GB- RAM).
7. Leave all the other options at their default settings, i.e., the partition scheme, target system, Volume Label, File System and Cluster Size. Advanced users may customize the options as required.
Note: The quick format option is enabled by default, and will erase all data on your USB Drive.
8. You should see the "Ready" status at the bottom. Click the Start button to begin creating your bootable Windows 11 ISO without TPM, Secure Boot and RAM requirements.
Wait for Rufus to finish the task. Once it completes the job, you can use your bootable media to install or upgrade your operating system to Windows 11 on an unsupported computer.
