This will be a lengthy post but hopefully it will show how I solved an issue which, I know through searching, others have had.
I received an Amiga A1200 some time ago from a chap that used to staff this forum. It was in nice condition but the keys were a bit yellowed. From a previous discussion with a friend who was (and still is) a biomedical scientist I was able to remove the (bromine flame retardant) yellowing using hydrogen peroxide. I know now that people do this with cream forms of H2O2 and UV light so as to not require a warm bath of the stuff but I was doing this in 2004. I did watch a YT video where someone said "RetroBrite" came to be in 2008 but all that consists of is H2O2 in a cream format, interesting as my friend's girlfriend owns a hair salon... Anyway...
In my usual geological timescale of getting round to things I dug the A1200 out a couple of months ago and found a suitable PSU and some phono cables to use it. I had a view of putting a HDD in and some games. I also found some Workbench 2.05 disks to get started. I played some A500 games on it including "Shadow of the Beast II" but after going to put the "Ten Pints" cheat in realised the space bar didn't work! I though it must be a quick fix, just a bit fluff on the pad or something, but no.
I think the case had been opened before as some screws were missing but I couldn't see anything obvious with the connection of the keyboard membrane to the main board. The A1200 keyboards are a thick Mylar film with silver tracks covered by a thinner layer of something and exposed graphite pads which are bridged by the conductive rubber parts on the back of the keys when pressed.
I probed some of the pads for continuity and indeed, one of the spacebar pads wasn't connected. I looked closely at the membrane and there seemed to be a discoloured patch. After poking into the silver tracks through the top layer it was clear that the spacebar track was broke somewhere in the discoloured patch. The silver tracks didn't look too good under the top film but it was difficult to tell if they were intact without probing.
I though I'd try bridging it by putting some conductive silver paint on but the problem was the proximity of other tracks. I scraped the top coating off and noticed the silver track didn't seem to have much integrity but I scraped back to areas which seemed to be in better condition. I had an idea to put some Kapton tape on either side to create a stencil channel and that went very well. Until I removed the Kapton tape...
The area as shown of the top film came off with the Kapton tape. I realised that the discoloured area was delamination between the heavier base and the possibly sprayed-on top layer. The tracks in this area were not on good condition. Maybe from heat from the mainboard but this wasn't a well-used A1200 so possibly a manufacturing defect.
So, I went from one broken track to five, as some of the tracks got pulled up too.
I looked online and someone had recreated the whole membrane but these were about £25 and no one had stock. I could do this myself as I I have good PCB layout experience but it would be expensive for one unit!
What I needed was a less-fiddly-than-stencilling-tracks solution which didn't involve heat as the silver tracks or Mylar wouldn't enjoy it.
I obtained some 0.1102mm enamelled wire, I have no idea why it is that diameter but that's what the reel tells me. I then scraped back to good areas of silver track on the Mylar film keymat (in future I'd find track areas next to pads and attach there) and positioned the end of a piece of this wire. The end has to be prepared very well, all the enamel has to be scraped off using a scalpel or similar. The stripped end then has to be held near the good silver trace on the Mylar film, I used small bits of masking tape but care must be taken to bend the wire in ways that pushes it down towards the track.
I used conductive silver paint to join the wires to the tracks. I don't think I've seen a someone using this to connect copper wire to silver track on Mylar film as a repair but I found it very effective. The difficulty is in keeping the wire close enough to the track and then applying several "dabs" of silver paint and keeping it stable until the paint cures. I obtained good results by applying dabs of silver paint over the course of several days using a dental probe. When you dab a bit on it spreads out, so be aware of that.
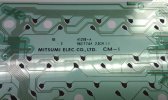
This is the A1200-A 56C774A keymat in question:
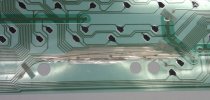
This is what I'd consider a terrible repair. Note how much of the green top layer is missing (that's the bit I ripped off). I think it might not last as the silver tracks are exposed and they may oxidise, it was an experimental procedure though . I used bits of tape as shown but removed those and put bits on which are less likely to interfere with the key mechanisms. This might be an area heated by the main board but it was discoloured in my example.
I took some micrographs of the wire-to-track bonding.
This is the joint to the top right of the picture, if I remember right. My objectives don't have a very high depth of field but you can see the scalpel scrape marks in the thick Mylar and what I'd consider a good fillet of silver paint on the wire.
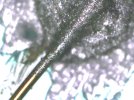
Here's another joint where I pushed the paint away from another track at the top. The good silver track can be seen to the right. The bit at the top of the picture is another wire.
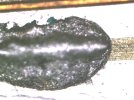
Another picture of how the wire-to-track bonding with silver paint worked out. This is the same joint as the above picture but with optical focus on the wire and paint.
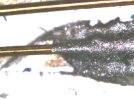
Something I noticed with the silver paint is that it can take a while to become a low resistance (using a DMM). Thin coats are the key too as a glob of the paint will never dry. I applied about three coats per joint over three days.
So, I need a 2.5" drive cable now. About £5 at Farnell, I believe. Then a 50-odd point list completed on how to get a >4GB HDD installed .
.
Also, just about everything dissolves this green coating so I'd stick to scraping it off as solvents will make things get out of hand somewhat quick. This is why I left the wires tacked with tape rather than something liquid.
I received an Amiga A1200 some time ago from a chap that used to staff this forum. It was in nice condition but the keys were a bit yellowed. From a previous discussion with a friend who was (and still is) a biomedical scientist I was able to remove the (bromine flame retardant) yellowing using hydrogen peroxide. I know now that people do this with cream forms of H2O2 and UV light so as to not require a warm bath of the stuff but I was doing this in 2004. I did watch a YT video where someone said "RetroBrite" came to be in 2008 but all that consists of is H2O2 in a cream format, interesting as my friend's girlfriend owns a hair salon... Anyway...
In my usual geological timescale of getting round to things I dug the A1200 out a couple of months ago and found a suitable PSU and some phono cables to use it. I had a view of putting a HDD in and some games. I also found some Workbench 2.05 disks to get started. I played some A500 games on it including "Shadow of the Beast II" but after going to put the "Ten Pints" cheat in realised the space bar didn't work! I though it must be a quick fix, just a bit fluff on the pad or something, but no.
I think the case had been opened before as some screws were missing but I couldn't see anything obvious with the connection of the keyboard membrane to the main board. The A1200 keyboards are a thick Mylar film with silver tracks covered by a thinner layer of something and exposed graphite pads which are bridged by the conductive rubber parts on the back of the keys when pressed.
I probed some of the pads for continuity and indeed, one of the spacebar pads wasn't connected. I looked closely at the membrane and there seemed to be a discoloured patch. After poking into the silver tracks through the top layer it was clear that the spacebar track was broke somewhere in the discoloured patch. The silver tracks didn't look too good under the top film but it was difficult to tell if they were intact without probing.
I though I'd try bridging it by putting some conductive silver paint on but the problem was the proximity of other tracks. I scraped the top coating off and noticed the silver track didn't seem to have much integrity but I scraped back to areas which seemed to be in better condition. I had an idea to put some Kapton tape on either side to create a stencil channel and that went very well. Until I removed the Kapton tape...
The area as shown of the top film came off with the Kapton tape. I realised that the discoloured area was delamination between the heavier base and the possibly sprayed-on top layer. The tracks in this area were not on good condition. Maybe from heat from the mainboard but this wasn't a well-used A1200 so possibly a manufacturing defect.
So, I went from one broken track to five, as some of the tracks got pulled up too.
I looked online and someone had recreated the whole membrane but these were about £25 and no one had stock. I could do this myself as I I have good PCB layout experience but it would be expensive for one unit!
What I needed was a less-fiddly-than-stencilling-tracks solution which didn't involve heat as the silver tracks or Mylar wouldn't enjoy it.
I obtained some 0.1102mm enamelled wire, I have no idea why it is that diameter but that's what the reel tells me. I then scraped back to good areas of silver track on the Mylar film keymat (in future I'd find track areas next to pads and attach there) and positioned the end of a piece of this wire. The end has to be prepared very well, all the enamel has to be scraped off using a scalpel or similar. The stripped end then has to be held near the good silver trace on the Mylar film, I used small bits of masking tape but care must be taken to bend the wire in ways that pushes it down towards the track.
I used conductive silver paint to join the wires to the tracks. I don't think I've seen a someone using this to connect copper wire to silver track on Mylar film as a repair but I found it very effective. The difficulty is in keeping the wire close enough to the track and then applying several "dabs" of silver paint and keeping it stable until the paint cures. I obtained good results by applying dabs of silver paint over the course of several days using a dental probe. When you dab a bit on it spreads out, so be aware of that.
This is the A1200-A 56C774A keymat in question:

This is what I'd consider a terrible repair. Note how much of the green top layer is missing (that's the bit I ripped off). I think it might not last as the silver tracks are exposed and they may oxidise, it was an experimental procedure though

I took some micrographs of the wire-to-track bonding.
This is the joint to the top right of the picture, if I remember right. My objectives don't have a very high depth of field but you can see the scalpel scrape marks in the thick Mylar and what I'd consider a good fillet of silver paint on the wire.

Here's another joint where I pushed the paint away from another track at the top. The good silver track can be seen to the right. The bit at the top of the picture is another wire.

Another picture of how the wire-to-track bonding with silver paint worked out. This is the same joint as the above picture but with optical focus on the wire and paint.

Something I noticed with the silver paint is that it can take a while to become a low resistance (using a DMM). Thin coats are the key too as a glob of the paint will never dry. I applied about three coats per joint over three days.
So, I need a 2.5" drive cable now. About £5 at Farnell, I believe. Then a 50-odd point list completed on how to get a >4GB HDD installed
Also, just about everything dissolves this green coating so I'd stick to scraping it off as solvents will make things get out of hand somewhat quick. This is why I left the wires tacked with tape rather than something liquid.
